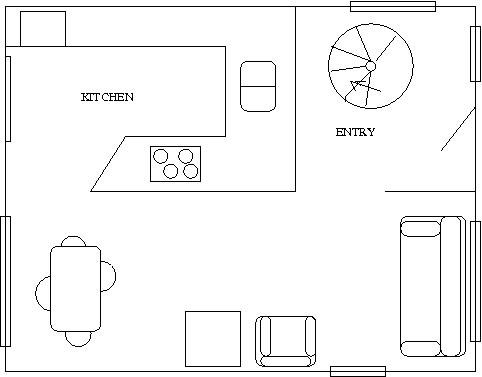
Figure 1. CGS2470 - Project #6: Floorplan of the first floor of a house.
It will help if you imagine that you are in architectural or interior design practice, and a client brings this sketch to you. So, you are supposed to design a house (inside and out) based on this sketch, and the things you have learned up through Project 5 (and our discussion of Viz, together with Viz tutorials and video lessons). However, there are some basic attributes of the drawing that CANNOT be altered. A list of such attributes is given from time to time in the description. Be sure to read it carefully.
Step 2. Draw the exterior walls using the 'Wall' command on the 'Create AEC' tab of the Tab Panel. The default height of the walls is eight feet. If you want to alter this, use the 'Modify' tab of the Command Panel. (Tip : To modify any object after it has been drawn, change the parameters in the 'Modify' tab of the Command Panel.)
Step 3. Draw the interior walls as shown in class. To enable you to draw the interior in detail, turn off the display for the exterior walls using the 'Display' tab of the Command Panel.
Step 4. As shown in the floorplan of Figure 1, draw the living room and kitchen. The living room must have at least one sofa, at least one chair, and at least one table. It is better to import these objects from the 'Asset Browser'. Use move, scale, or rotate to place them where you want. (Tip : When moving/scaling/rotating multiple objects, draw a bounding rectangle around all the objects and then use the command.) Place a big window in the living room as you would find in a real one. Use the 'door' command to draw the door to the room.
The kitchen must include a refrigerator, a kitchen counter complete with sink, and a wall cabinet. It is ok if you do not draw all the details of the cabinet, refrigerator, etc. As shown in class, you can use the subtract command to draw an inverted L-shaped counter. (Tip : Before using the subtract command, assign the material you want to use for the final object to both the object to subtract from and the object to be subtracted. This helps in avoiding problems with materials later.)
Step 5. The first floor must have a kitchen and a living
room. Other rooms such as a bathroom, dining room, etc are optional,
but highly recommended. Put in the front door and doors, and windows
appropriately in all the rooms on this floor. Add materials to the
drawing using the Material Library chooser (accessed via the Open button after you click the Material Library radio button). There
are other specific libraries available for materials for the floor,
roof, etc. Use them to get a good effect.
Note : When
adding materials to walls, make sure the material is a adequately
transparent so as to enable us to see through the walls. You will lose
points if the walls are opaque.
Step 1. Use the 'Edit->Clone' feature to make a copy of the first floor. Move it so that it sits on top of the interior walls to form the second floor. Draw a staircase (choose from one of the four types in Viz) connecting the first and the second floors. Modify the staircase so that it has the correct height. Cut out a small part of the second floor to provide a landing for the stairs. You may add a center pole, railings, etc. depending upon the type of staircase you are using.
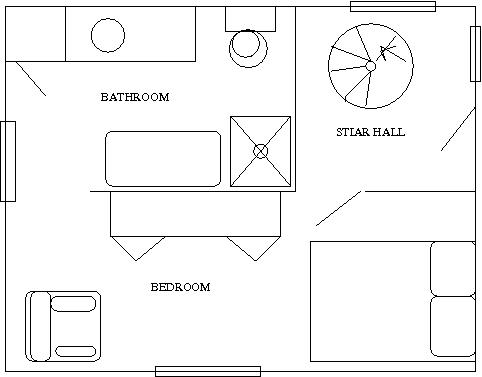
Step 2. As shown in figure 2, put in a bedroom and a bathroom on the second floor. The bedroom must contain a bed, wardrobe and a small table. You are free replace the table with a dresser. You may add a balcony attached to the bedroom. The balcony, is optional.
The bathroom must contain a bathtub, toilet, and washbasin. Use the methods shown in class to draw these objects. You can alter the position of any of the pieces of furniture. However, all the pieces listed as a must-have MUST be present.
Step 3. As you have done for the first floor, place the doors and windows appropriately on the second floor. Add a ceiling and roof as shown in class. Assign appropriate materials taking care to modify the color or opacity as necessary.

Figure 1. CGS2470 - Project #6: Floorplan of the first
floor of a house.

Figure 2. CGS2470 - Project #6: Floorplan of the second
floor of a house.
The plans shown above are for your reference. You need not stick to these drawings in every detail. You are free to alter the placement of rooms, furniture, walls, etc.
Grading. The project (drawing) will be graded as follows:
   Item               		 Score
   ---------------------         ----------
   2 Floors as shown        	 10 points  (5 points each)
   Furniture 		    	 40 points
   Doors placed in walls    	 10 points
   Windows placed in walls  	 10 points
   Materials			 15 points
   Exterior and Interior walls	  5 points
   Staircase		     	  5 points
   Roof			     	  5 points
   --------------------------------
   MAXIMUM SCORE        	100 points
   --------------------------------
Hardcopy. The completed project (drawing) should be printed on a laser printer. Six pages should be handed in, as follows:
Each page must have your name, last four digits of UF ID number, and class legend clearly visible. All pages must be stapled together with a metal staple, not folded over or handed in loose. Otherwise, your pages could get lost.