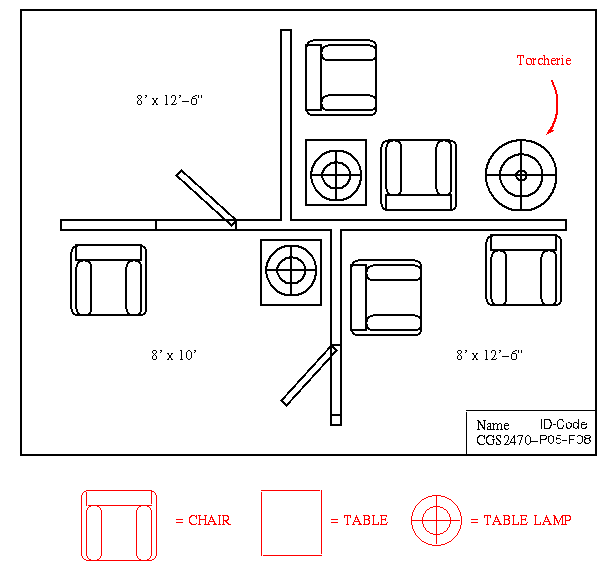
Figure 1. CGS2470 - Project #5: Floorplan of a simple 3-room living space with chairs, tables, and lamps.
Do not include in your drawing the items marked in red. They are notes for your information only.
Step 2. Draw the room partitions in 3-D as you did in Project 6, using the floorplan of Figure 1 as a guide for wall and door placement. As we did in class, use the SUBTRACT command to make the doors, and hang the open door in the doorframe. On at least one door, put a little detail like a doorknob (sphere attached to horizontal cylinder), and maybe a doorcasing (built up from slabs).
Step 3. Draw the furniture shown in the floorplan of Figure 1, as we did in class. Use the FILLET command as demonstrated in class to round off the corners and edges of the chair cushions.
For extra credit, raw a torcherie (floor lamp with light washing upward on a nearby wall), and place it in one of the rooms. If you do not know what a torcherie looks like, go to a local furniture store and ask to see one. Tell them it is for a class project, and they will be happy to help. Also, while you are in the store, check out the different kinds of chairs, tables, and materials that are used on them, so you can make your drawing more realistic when we do that in Project 6-10.
Step 4. Depending on what materials CIRCA has available for you to attach to the objects, make realistic textures for the tables (e.g., wood), chairs (e.g., fabric), and lamps, also carpet, wood, or marble for the floors. The walls should be a nice-looking matte color. Since many of you plan to be interior designers, I will leave that to your discretion.
Step 5. In the unoccupied area shown in Figure 1, enter your name and "CGS2470-P5-F08". It must be clearly readable on at least one of the views. Do this in 2-D (x-y plane), just like you did for Project 2. You do not need to draw a bounding box for this project.
Step 6. Add vertical dimensioning to two of the walls (you choose which ones), showing the walls to be nine feet tall. Add horizontal linear dimensioning to the rooms, to reflect the room size stated in the floorplan. Make the dimension text large enough to read in 3-D view. Remember that the 3-D view foreshortens the text, so you will have to make it about 30 percent larger for the isometric views than you would make it in a 2-D view.
Step 7. Print out two isometric views of your drawing (e.g., NW or SE isometric views), with each view in rendered mode and in wireframe mode. Use the isometric view icons on the toolbar and the screen capture facility to produce these views. You must have two different perspective views.

Figure 1. CGS2470 - Project #5: Floorplan of a simple
3-room living space with chairs, tables, and lamps.
Do not include in your drawing the items marked in red. They are notes for
your information only.
Grading. The project (drawing) will be graded as follows:
   Item                  Score
   --------------------- ----------
   Chairs as shown       25 points  (5 points each)
   Tables as shown       15 points
   Lamps                 10 points  (5 points each)
   Doors placed in walls 10 points
   Walls drawn correctly 10 points
   Dimensioning on walls 10 points
   Room dimensioning     10 points
   Wall dimensioning      5 points
   Name, Id-code, etc.    5 points
   --------------------------------
   MAXIMUM SCORE        100 points
   Torcherie (extr. crd) 10 points
   --------------------------------
   MAX.TOTAL SCORE      110 points
Hardcopy. The completed project (drawing) should be printed on a color laser printer. Five pages should be handed in, as follows:
Each page must have your name, ID-code, and class legend clearly visible. All pages must be stapled together with a metal staple, not folded over or handed in loose. Otherwise, your pages could get lost.